
iPhone Battery Repair Guide
Portship.pk developed the iPhone Battery Repair Guide by consulting local technicians posing as customers, engaging with & examining iPhone users on social media, and seeking input from our existing customer base. The primary goal of this guide is to provide clarity to customers, ensuring they can navigate through potential confusion and avoid falling victim to subpar or deceptive repair services. Moreover, we aim to empower customers to take charge of their iPhone battery repairs independently, promoting self-sufficiency rather than dependence on inexperienced technicians.
Significant investments of time, money, and data have been dedicated to build this guide with the sole intention of simplifying your experience. Take the time to read it attentively, do not scroll through, and understand each step carefully, including watching all accompanying videos.
iPhone Battery Repair Guide
If you have decided to replace your iPhone’s battery and planning to do it yourself (DIY), but you don’t know where to start or if you just simply want to understand the process then this is the guide for you. Read and follow the instructions carefully and make sure you don’t miss any step. The key to a successful DIY repair is just patience, please don’t rush.
The sole purpose of the iPhone battery repair guide is to educate our customers about the simple process of battery replacement for iPhones. Also, we assure you that this guide will also help you to stay safe from unwanted, unprofessional and bad repair job.
Equipment Needed for Battery Repair
Following are the tools needed (DIY tools are available under “Kits & Accessories” product category):
-
DIY Toolkit (Flat head, Pentalobe, Phillips and Try-wing screwdrivers) with suction cup, pick and pry stick.
- ESD Tweezers (optional: it makes things a-lot easier).
- 99.9% Isopropyl Alcohol (Alcohol pads works too.
- iPhone Waterproof Seal also known as “iPhone Frame Sticker” (must be replaced, each time the screen is lifted).
- Heat-gun or Hair dryer (Optional: helps to loosen up the waterproof seal and makes it easy to lift the screen).
- A pen and a paper tape (to mark screws’ positions; look at the attached picture).
- Access to YouTube.
- and obviously our iPhone Battery by Deji®.
- Carefully read our iPhone Battery Repair Guide.
This section of the guide is crucial, as it addresses common mistakes made by DIYers and technicians. One of the most frequently reported issues after a battery replacement is battery percentage fluctuations and sudden restarts. Sometimes this happens immediately after the repair, while in other cases, it occurs after a few days.
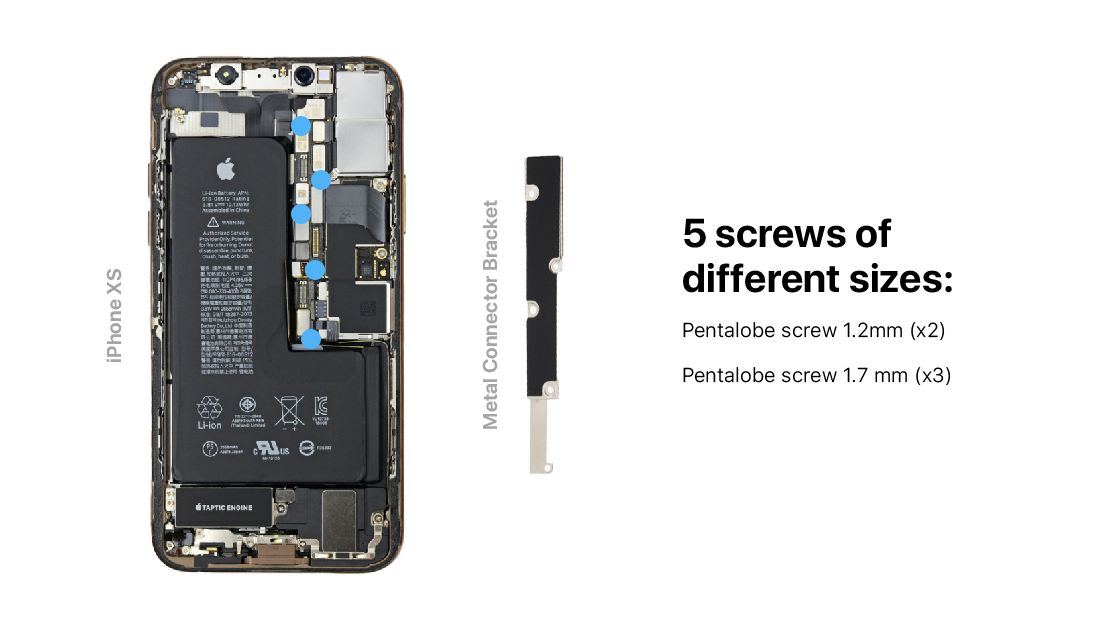
The main cause of this problem is the metal connector bracket that holds all the connectors in place (as shown in the image below for an iPhone XS). Technicians often forget to install the bracket, or if they do install it, they might use the wrong screws or leave some screws out entirely.
It’s essential to place each screw exactly where it came from. Be sure to note or remember which screw came out of which hole. If the bracket is not installed correctly—or not installed at all—the battery connector may become loose, leading to battery percentage fluctuations and unexpected restarts.
Crucial Insights for Battery Repair
Noteworthy Points
There is no better way to learn than watching and observing what the professional do. Here, we want you to to watch a couple of videos made by trained professionals. This will help you understand the entire process more effectively and understand the next section of this quick guide. Following are the links to YouTube videos uploaded by professionals who are well known internationally:
- “YouTube Link” by Deji® (iPhone XR Battery Replacement)
- “YouTube Link” by iFixit (iPhone X Battery Replacement)
- “YouTube Link” by Techzone UK (waterproof seal application)
- “YouTube Link” by iFixt (waterproof seal application)
Note: you must watch videos made specifically for your iPhone model (there are tons and tons of videos available online). There are paper thin flex cables under and on the screen that can be damaged if you lift the screen the wrong way. For instance iPhone 6 (screen) is lifted towards the front whereas iPhone X (screen) should be lifted towards the right, not doing so can and will result in damages.
After watching all those video we are sure that you are quite confident and almost ready to start the replacement process. Before you do so, do read the following points that have been notified by other DIYers & Technicians (our customers) and some by us. So, that you can watch those sections of the videos again closely and be prepared in advance:
- Discharge your static body current (especially in winters) also known as ESD in the industry. To discharge current from your body walk bare foot on ground and touch any metal that is connected with the ground such as; metal screw in the wall, a metal pole, etc.
- Make sure the surface on and environment you work in is free of dust, dust acts as an insulator which can cause further overheating and also clog up integrated circuit boards causing a short circuit, particularly if there are conductive materials making up the dust.
- Always Use MFi Certified or high quality charging accessories.
- Keep a plate or tray next to you so that you don’t loose any screws or shields.
- Remember, take picture or write down which screw belong to what hole for the battery connector bracket/shield, never mix up! (Most common issue reported by our customers).
- Watch battery replacement videos for your own iPhone model, as that is what you have to see, copy and implement on your own device.
- Lifting the screen has been reported to be the most difficult part in the whole process and second tricky step reported is pulling the adhesive strip without breaking it, because once you break it you are forced to use the “pry and scrape” technique that’s way more time consuming and frustrating (like they say in the videos “twist & pull”, its way easier and oddly satisfying!).
- Few customers reported that waterproof adhesive does not stick to the frame; the answer is “Dust”, Dust is your enemy until you are done with the repair. The edges of the aluminum frame should free of any glue (black color) residue or dust. Use alcohol to clean, use the corner of the pry tool to scrap it (never use a metal object to do that, always choose hard but smooth plastic).
- A professional technician take 5 – 10 mins to finish the job, our customers feedback data shows that on average beginners finish in around 15 – 50mins. Like we said no need to rush, just take your time.
Final Step!
Hopefully you must be quite confident by now and must be excited to start the process. You can always WhatsApp us to clear any doubts or questions if you have.
Replace it on your gaming/work table in a peaceful and dust free environment, try and take pictures and share on our social media pages with #iPhonerepair under reviews section. So, that others can learn from you.
DIY, Snap &
Share
Still don't feel confident enough!?
No worries, its your decision. The best part is that now you know in and out how a battery replacement works on an iPhone and you would agree that its pretty easy to DIY. Now, when you take it to your nearest technician, remember what you learned above and request the technician to replace the battery right in front you.
Before selecting a technician, we strongly advise against opting for the cheapest option. While it may seem cost-effective, services offered at lower prices often come at the expense of quality. Always prioritize an experienced technician with proper tools to ensure a professional repair.